Saturday 26 September 2015

hbm2dao & hbm2java: Auto generate POJO model and DAO classes from database schema using JBoss Tools Hibernate plugin.

This tutorial shows how to generate POJO model classes and DAO classes from database tables. This approach is reverse engineering approach to generate code from already existing database tables.

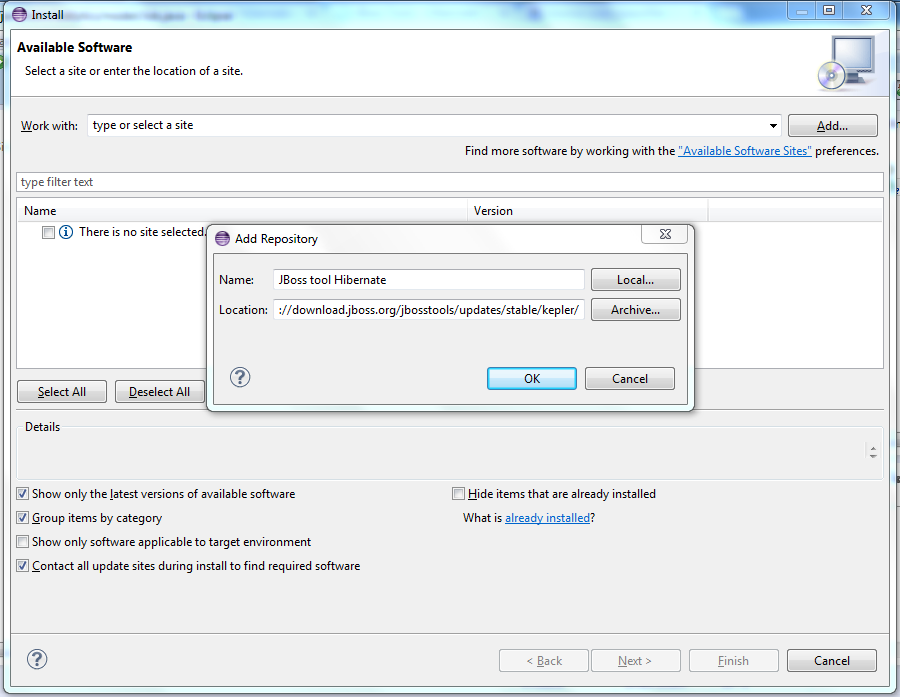
We will use use Hibernate Plugin provided in JBoss tools for this tutorial. If you want to configure this plugin in your eclipse please refer this post:


Tools used :
Please follow these steps to generated Annotated Java code from database.

1. Generate Hibernate.cfg.xml & Hibernate Console configuration using Hibernate plugin

We will auto generate Hibernate.cfg.xml using Hibernate plugin. This is same configuration will be used in Hibernate Console creation (which is required to create java code).

Select location where you want to generate Hibernate.cfg.xml file as follow.

eg. src/main/resources/META-INF

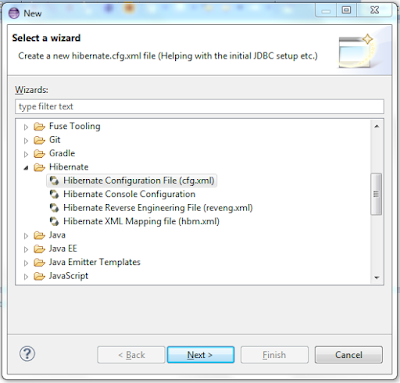
Right click on folder --> New --> Other


Now Following window will open. Showing various option. 

Select Hibernate --> Hibernate Configuration File (cfg.xml)


Click on : Next --> Next 

Now following window will appear. 


Now you have to add the database properties in this box.

Database Dialect : org.hibernate.dialect.MySQL5InnoDBDialect
Driver Class     : com.mysql.jdbc.Driver
Connection URL   : jdbc:mysql://localhost:3306/test (test is schema)
usernam          : root
password         : *****

Add these properties in box. And make sure you check the check box saying 'Create a Console Configuration


Click On : Next

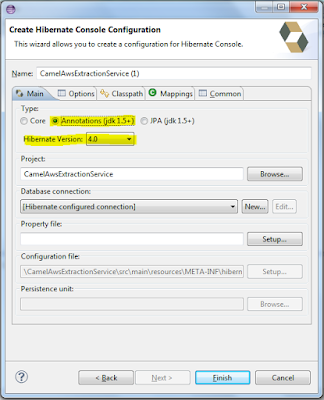
Following window will appear.


Please make sure you select Type : 'Annotations (jdk1.5+)' to enable annotations on POJO classes, So that you do not require mapping file.

Select Appropriate Hibernate version as per your requirements.

Now you can see Hibernate.cfg.xml generated in your project as follow.

<?xml version="1.0" encoding="UTF-8"?>
<!DOCTYPE hibernate-configuration PUBLIC
  "-//Hibernate/Hibernate Configuration DTD 3.0//EN"
  "http://hibernate.sourceforge.net/hibernate-configuration-3.0.dtd">
<hibernate-configuration>
    <session-factory>
        <property name="hibernate.connection.driver_class">com.mysql.jdbc.Driver</property>
        <property name="hibernate.connection.password">*****</property>
        <property name="hibernate.connection.url">jdbc:mysql://localhost:3306/test</property>
        <property name="hibernate.connection.username">root</property>
        <property name="hibernate.dialect">org.hibernate.dialect.MySQL5InnoDBDialect</property>
    </session-factory>
</hibernate-configuration>

2. Generate model POJO and DAO classes.

Now you have to generate classes from Hibernate Console configuration you have created in previous step.

 Open Hibernate Perspective

Click On : window --> Open Perspective --> Other ..

This window will appear on screen.


Now you have to Select 'Hibernate' from list and click 'Ok'. If not appear please follow this post to install it properly

Once you open Hibernate perspective, you should be able to see the Hibernate Console Configuration you have created in previous step.


Now you can see all the table available in schema you have configured in previous step.

Click on : Run --> Hibernate Code Generation ... --> Hibernate Code Generations Configurations ... 


Now this window will open.


You have to select Console Configuration created in previous step.

Then you can select the Output Directory where source will be generated eg. {PROJECT}\src\main\java

Then check option 'Reverse Engineering From JDBC Connection'


Now we need to create reveng.xml file which will contain tables for which we want to generate Java code.

Click on : reveng.xml setup --> (Pop up) will open --> Create new.. 

Select Directory where you want to store this reveng.xml file. (keep it same as Hibernate.cfg.xml directory)


Click on : Next 

Select Console Configuration. Now schema will appear in left panel, if you cant see schema then click 'Refresh' present below.


Select tables and click on 'Include'

Once you have selected all the tables click on Finish. 

Now your reveng.xml is created. 

Now you have to select what are the things which you have to generate for selected tables.

Select 'Exporter' tab in window as follow.


Select 'Domain code (Java)' to generate POJO classes
'DAO code (Java)' to generate Dao classes

Check general setting as mentioned to enable Annotation in generated code.

Now you can see the generated code in package you had mentioned.


You can restructure the package as per your design.

Done :)

Friday 25 September 2015

Step by step Installation of JBoss Tools - Hibernate plugin in Eclipse Kepler

Hibernate JBoss tool eases developer's work with JPA (or Hibernate). You can easily generate lot of stuff related to Hibernate which is difficult (and error prone) while doing manually.

       You can generate Hibernate configurations (*.hbm.cfg.xml), java model classes and mapping file or annotated model classes. Basically it follows concept of reverse-engineering. So if you are not using hbm2ddl to generate Tables from Java model then this plugin will help you generate model classes from existing Tables.

This is Eclipse used in this post.


Eclipse : Version: Kepler Service Release 2

Follow these steps to install this Hibernate JBoss plugin in you Eclipse Kepler.

Click on : Hep --> Install New Software 


This window will appear on screen.


Click on : Add button

Now copy following URL and paste it in "Location field"

http://download.jboss.org/jbosstools/updates/stable/kepler/


And click 'Ok' button.

Now following screen will appear displaying all plugin available from JBoss tool site (there are lot of helpful plugins there from JBoss but we will focus on Hibernate plugin for now)


Now we have to select required Hibernate plugin out of all available ones.

Expand option 'JBoss Application Development' available in list. And you can see 'Hibernate Tools' in expanded list. Select this tool in that list.


Now click next and finish it. It will take time to load and install plugin.

Once installation is finished restart your eclipse.

Now you can see your installed plugin in perspectives.

Click on : window --> Open Perspective --> Other ...

Following window will appear displaying all perspectives. You can see your recently install Hibernate plugin available in that.


And done :)

Download sites and References :

Monday 4 May 2015

Deploy WAR on tomcat from maven command

Many times while doing testing of web project (.war) during development phase we have to deploy project on tomcat server frequently. So every times we have copy war file then paste it to {TOMCAT_HOME}\webapp directory. Some times need to restart tomcat as well.

My this post focuses on reducing this time by automating deployment from maven command.  So we can deploy, un-deploy, update war file and also do start, stop tomcat server from Maven command.

For this automation we have make changes in following files.

    1.{TOMCAT_HOME}/conf/tomcat-users.xml
    2.{MAVEN_HOME}/conf/settings.xml
    3.{PROJECT_HOME}/pom.xml
    4.Use this configured plugin to deploy, undeploy etc.
 
 let's start making above changes one by one. This post uses tomcat6 however if you are using different tomcat version, you can achieve same by using tomcat version specific plugin in step. 3.

1. Update {TOMCAT_HOME}/conf/tomcat-users.xml

   Add 'manager-script' role and its username/password.  Properties highlighted in yellow are only relevant properties with this tutorial.
<?xml version='1.0' encoding='utf-8'?>
<tomcat-users>
  <role rolename="tomcat"/>
  <role rolename="manager-gui"/>
  <!-- 'manager-script' role will be used for deployment from Maven -->
  <role rolename="manager-script"/>
  <user username="admin" password="tomcat" roles="tomcat,manager-gui,manager-script"/>
</tomcat-users>

2. Update {MAVEN_HOME}/conf/settings.xml

   Update you maven settings.xml file with below snippet. Keep rest of the part of settings.xml as it is.
<?xml version="1.0" encoding="UTF-8"?>
<settings>
  ...
  <servers>
   	<server>
		<id>TomcatServer</id>
		<!-- Username/password below should match with one mapped with 'manager-script' role in tomcat_home/conf/tomcat-users.xml file-->
		<username>admin</username>
		<password>tomcat</password>
	</server>
  </servers>
  ...
</settings>

Username/Password should match with username/password configured with role 'manager-script' in step 1.

3. Update {PROJECT_HOME}/pom.xml

   Update the following part in your pom.xml. Value of <server> should match with value of     <id>TomcatServer</id> in {MAVEN_HOME}/conf/settings.xml file
<project xmlns="http://maven.apache.org/POM/4.0.0" xmlns:xsi="http://www.w3.org/2001/XMLSchema-instance"
	xsi:schemaLocation="http://maven.apache.org/POM/4.0.0 http://maven.apache.org/maven-v4_0_0.xsd">
	...
	<build>
		<finalName>ConcatService</finalName>
		<plugins>
			...			
			<plugin>
				<groupId>org.apache.tomcat.maven</groupId>
				<artifactId>tomcat6-maven-plugin</artifactId> 
                                <!-- For tomcat7 use -->
                                <!-- <artifactId>tomcat7-maven-plugin</artifactId> -->  
                                <version>2.2</version>
				<configuration>
					<url>http://localhost:8080/manager</url>
					<server>TomcatServer</server>
					<path>/ConcatService</path>
				</configuration>
			</plugin>
			...
		</plugins>
	</build>
</project>


4. Useful tomcat maven plugin goals.
mvn tomcat6:redeploy
mvn tomcat6:undeploy
mvn tomcat6:start
mvn tomcat6:stop 

Some Useful links.
Error Resolutions : 
If you got following error while executing any of the tomcat goals. (Which i had got.)


[INFO] [war:war {execution: default-war}]
[INFO] Packaging webapp
[INFO] ------------------------------------------------------------------------
[ERROR] FATAL ERROR
[INFO] ------------------------------------------------------------------------
[INFO] Cannot construct org.apache.maven.plugin.war.util.WebappStructure as it does not have a no-args constructor
---- Debugging information ----
message             : Cannot construct org.apache.maven.plugin.war.util.WebappStructure as it does not have a no-args constructor
cause-exception     : com.thoughtworks.xstream.converters.reflection.ObjectAccessException
cause-message       : Cannot construct org.apache.maven.plugin.war.util.WebappStructure as it does not have a no-args constructor
class               : org.apache.maven.plugin.war.util.WebappStructure
required-type       : org.apache.maven.plugin.war.util.WebappStructure
path                : /webapp-structure
line number         : 1
-------------------------------
[INFO] ------------------------------------------------------------------------
[INFO] Trace
com.thoughtworks.xstream.converters.ConversionException: Cannot construct org.apache.maven.plugin.war.util.WebappStructure as it does not have a no-args constructor
---- Debugging information ----
message             : Cannot construct org.apache.maven.plugin.war.util.WebappStructure as it does not have a no-args constructor
cause-exception     : com.thoughtworks.xstream.converters.reflection.ObjectAccessException
cause-message       : Cannot construct org.apache.maven.plugin.war.util.WebappStructure as it does not have a no-args constructor
class               : org.apache.maven.plugin.war.util.WebappStructure
required-type       : org.apache.maven.plugin.war.util.WebappStructure
path                : /webapp-structure
line number         : 1
-------------------------------
    at com.thoughtworks.xstream.core.TreeUnmarshaller.convert(TreeUnmarshaller.java:63)
    at com.thoughtworks.xstream.core.AbstractReferenceUnmarshaller.convert(AbstractReferenceUnmarshaller.java:45)
    at com.thoughtworks.xstream.core.TreeUnmarshaller.convertAnother(TreeUnmarshaller.java:46)
    at com.thoughtworks.xstream.core.TreeUnmarshaller.start(TreeUnmarshaller.java:117)
    at com.thoughtworks.xstream.core.ReferenceByXPathMarshallingStrategy.unmarshal(ReferenceByXPathMarshallingStrategy.java:29)
    at com.thoughtworks.xstream.XStream.unmarshal(XStream.java:846)
    at com.thoughtworks.xstream.XStream.unmarshal(XStream.java:833)
    at com.thoughtworks.xstream.XStream.fromXML(XStream.java:781)
    at org.apache.maven.plugin.war.util.WebappStructureSerializer.fromXml(WebappStructureSerializer.java:73)
    at org.apache.maven.plugin.war.AbstractWarMojo.buildWebapp(AbstractWarMojo.java:404)
    at org.apache.maven.plugin.war.AbstractWarMojo.buildExplodedWebapp(AbstractWarMojo.java:375)
    at org.apache.maven.plugin.war.WarMojo.performPackaging(WarMojo.java:181)
    at org.apache.maven.plugin.war.WarMojo.execute(WarMojo.java:143)
    at org.apache.maven.plugin.DefaultPluginManager.executeMojo(DefaultPluginManager.java:490)
    at org.apache.maven.lifecycle.DefaultLifecycleExecutor.executeGoals(DefaultLifecycleExecutor.java:694)
    at org.apache.maven.lifecycle.DefaultLifecycleExecutor.executeGoalWithLifecycle(DefaultLifecycleExecutor.java:556)
    at org.apache.maven.lifecycle.DefaultLifecycleExecutor.executeGoal(DefaultLifecycleExecutor.java:535)
    at org.apache.maven.lifecycle.DefaultLifecycleExecutor.executeGoalAndHandleFailures(DefaultLifecycleExecutor.java:387)
    at org.apache.maven.lifecycle.DefaultLifecycleExecutor.executeTaskSegments(DefaultLifecycleExecutor.java:348)
    at org.apache.maven.lifecycle.DefaultLifecycleExecutor.execute(DefaultLifecycleExecutor.java:180)
    at org.apache.maven.DefaultMaven.doExecute(DefaultMaven.java:328)
    at org.apache.maven.DefaultMaven.execute(DefaultMaven.java:138)
    at org.apache.maven.cli.MavenCli.main(MavenCli.java:362)
    at org.apache.maven.cli.compat.CompatibleMain.main(CompatibleMain.java:60)
    at sun.reflect.NativeMethodAccessorImpl.invoke0(Native Method)
    at sun.reflect.NativeMethodAccessorImpl.invoke(NativeMethodAccessorImpl.java:57)
    at sun.reflect.DelegatingMethodAccessorImpl.invoke(DelegatingMethodAccessorImpl.java:43)
    at java.lang.reflect.Method.invoke(Method.java:601)
    at org.codehaus.classworlds.Launcher.launchEnhanced(Launcher.java:315)
    at org.codehaus.classworlds.Launcher.launch(Launcher.java:255)
    at org.codehaus.classworlds.Launcher.mainWithExitCode(Launcher.java:430)
    at org.codehaus.classworlds.Launcher.main(Launcher.java:375)
Caused by: com.thoughtworks.xstream.converters.reflection.ObjectAccessException: Cannot construct org.apache.maven.plugin.war.util.WebappStructure as it does not have a no-args constructor
    at com.thoughtworks.xstream.converters.reflection.PureJavaReflectionProvider.newInstance(PureJavaReflectionProvider.java:59)
    at com.thoughtworks.xstream.converters.reflection.AbstractReflectionConverter.instantiateNewInstance(AbstractReflectionConverter.java:257)
    at com.thoughtworks.xstream.converters.reflection.AbstractReflectionConverter.unmarshal(AbstractReflectionConverter.java:124)
    at com.thoughtworks.xstream.core.TreeUnmarshaller.convert(TreeUnmarshaller.java:56)
    ... 31 more

Solutions for above error: Just remove old target directory ({PROJECT_HOME}\target) or run $mvn clean command and then execute tomcat goal again. If still appears try to use updated version of 'tomcat6-maven-plugin'.


Sunday 3 May 2015

Create JAX-WS Web Service with Top down approach from scratch using maven (Java to WSDL)

Create Sample Web Project using maven eg.

mvn archetype:generate -DarchetypeArtifactId=maven-archetype-webapp -DgroupId=com.yogesh.patil -DartifactId=ConcatService -DinteractiveMode=false

Project structure must be created in current directory as follow.


Now start creating service implementation. For ease import this project in eclipse as follow.
Select Maven project to import in eclipse as follow ( If maven in not installed in your eclipse here are Steps to configure Maven in eclipse)


Now Select "Existing Maven Projects" option to import project.


Browse and select "ConcatService" project generated using maven. Now click on "Finish" to import project.
Now you can see imported "ConcatService" project in maven.


Create new Interface and implementation class with annotations which is to be exposed as web service as follow.

Interface.

package com.yogesh.patil;

import javax.jws.WebMethod;
import javax.jws.WebService;

@WebService
public interface ConcatService {

    @WebMethod
    public String concatString (String str1, String str2);
}

Implementation class.

package com.yogesh.patil;

import javax.jws.WebService;
import javax.jws.soap.SOAPBinding;
import javax.jws.soap.SOAPBinding.ParameterStyle;
import javax.jws.soap.SOAPBinding.Style;
import javax.jws.soap.SOAPBinding.Use;

@WebService(name="ConcatServiceImpService")
// Default biding Document/literal/wrapped
@SOAPBinding(style = Style.DOCUMENT, use=Use.LITERAL,parameterStyle=ParameterStyle.WRAPPED)
public class ConcatServiceImpl implements ConcatService {

    public String concatString (String str1, String str2) {
        return str1 + str2;
    }
}


From @SOAPBinding annotation on Web service class we can say this is Document/literal type web service with parameter types wrapped.

Now configure Apache CXF Plugin to generate WSDL from Java class using java2wsdl goal provided by this plugin.


<plugin>
 <groupId>org.apache.cxf</groupId>
 <artifactId>cxf-codegen-plugin</artifactId>
 <version>2.0.9</version>
  <dependencies>
   <dependency>
    <groupId>org.apache.cxf</groupId>
    <artifactId>cxf-rt-frontend-jaxws</artifactId>
    <version>2.0.9</version>
   </dependency>
  </dependencies>
  <executions>
   <execution>
    <id>generate-wsdl</id>
    <phase>process-classes</phase>
    <configuration>
     <outputFile>src/main/resources/WSDL/ConcatServiceImp.wsdl</outputFile>
     <className>com.yogesh.patil.ConcatServiceImp</className>
    </configuration>
    <goals>
     <goal>java2wsdl</goal>
    </goals>
   </execution>
  </executions>
</plugin>

Note- update highlighted part.
Download complete POM.

Create and configure JAX-WS deployment descriptor sun-jaxws.xml  in {PROJECT_HOME}\src\main\webapp\WEB-INF directory as follow.

NOTE - {PROJECT_HOME} indicates the location of project directory. This directory must contain pom.xml in our case.

<?xml version="1.0" encoding="UTF-8"?>
<endpoints xmlns="http://java.sun.com/xml/ns/jax-ws/ri/runtime"
 version="2.0">
 <endpoint name="ConcatServiceImpl"
  implementation="com.yogesh.patil.ConcatServiceImpl"
  url-pattern="/ConcatService" />
</endpoints>

Update web application configuration {PROJECT_HOME}\src\main\webapp\WEB-INF\web.xml

<!DOCTYPE web-app PUBLIC
 "-//Sun Microsystems, Inc.//DTD Web Application 2.3//EN"
 "http://java.sun.com/dtd/web-app_2_3.dtd" >

<web-app>
  <listener>
        <listener-class>
                com.sun.xml.ws.transport.http.servlet.WSServletContextListener
        </listener-class>
    </listener>
    <servlet>
        <servlet-name>ConcatService</servlet-name>
        <servlet-class>
         com.sun.xml.ws.transport.http.servlet.WSServlet
        </servlet-class>
        <load-on-startup>1</load-on-startup>
    </servlet>
    <servlet-mapping>
        <servlet-name>ConcatService</servlet-name>
        <url-pattern>/ConcatService</url-pattern>
    </servlet-mapping>
</web-app>

Add JAX-RT (Runt time) dependency to pom.xml

<!-- JAX-WS RT Dependency -->
<dependency>
 <groupId>com.sun.xml.ws</groupId>
 <artifactId>jaxws-rt</artifactId>
 <version>2.2.8</version>
</dependency>

Now execute $mvn clean install command. This command create .war file and also generate the WSDL file at mentioned location in plugin "<outputFile>src/main/resources/WSDL/ConcatServiceImp.wsdl</outputFile>"

Deployment file must be created in "{PROJECT_HOME}\target\ConcatService.war"


ConcatService\WEB-INF\classes\com\yogesh\patil\jaxws\ConcatString.class (JAWS generated request class)
ConcatService\WEB-INF\classes\com\yogesh\patil\jaxws\ConcatStringResponse.class (JAWS generated response class)
ConcatService\WEB-INF\classes\com\yogesh\patil\ConcatService.class
ConcatService\WEB-INF\classes\com\yogesh\patil\ConcatServiceImpl.class
ConcatService\WEB-INF\classes\WSDL\ConcatServiceImp.wsdl
ConcatService\WEB-INF\web.xml
ConcatService\WEB-INF\sun-jaxws.xml
ConcatService\index.jsp

Following are list of jar present in ConcatService\WEB-INF\lib, there are some jar which are not being used in our current code but these default jar's coming with JAXWS-RT dependency.


Copy ConcatService.war file to {TOMCAT_HOME}/webapps directory. Now start your tomcat server and access the deployed web service at following URL (assuming tomcat is configured to run on 8080 port)

"http://localhost:8080/ConcatService/ConcatService"

You can see deploymet as follow.


Now your web service is ready for testing. You test it by creating web service client or simply by Using tools like SOAP UI. Create new SOaP UI project.


Create Web service client using deployed Web service URL.


Click Ok. Now you are ready to invoke and test your web service.


now submit this request. You will get the response as follow.


You can download:

Some Useful links :

Software's used for this tutorial:
  • Windows 7 (64 bit)
  • JDK 1.6
  • Apache Tomcat 6.0.35
  • Apache CXF maven plugin v2.0.9
  • JAX-WS RT (Run time) v2.2.8
  • Development tool - Eclipse Kepler
Suggestions and recommendations are welcome. :)